Electric Cooling Fan
Spring 2003
Soon the car will be on the road. It has spent the winter, an old fashion harsh Maine winter at that, in a storage barn. The seats are at my home awaiting new foam and leather covers. The fuel injection project has been on a back burner for the winter.
Late last Fall I installed a large four post lift into my average size two car garage. Literally now one half of the entire building goes up and down. But it’s wonderful! Having a lift has always been a dream and now I’m living it. Could it be that I’m just getting too old to roll around on the floor? Anyway, even with a lift, playing in an unheated garage in Maine isn’t much fun. Then I ran across a gent selling used oil fired hot air furnaces and couldn’t resist. The furnace is 100K btu’s and a counter flow model (the hot air blows out the bottom), perfect for the garage. Heat blows out along the floor and there is no need for duct work.
Moving and redesigning the garage overhead framing to accommodate the lift took me longer than expected. I was being very careful not to have too much framing removed at any one time. There was usually a two to three foot snow load so caution was the mantra. Now the joists have been moved so a full size car or mid size pick up will go all the way up. Larger vehicles can go up but perhaps not to the very top. The lift is designed for 12,000 lbs. How many TR6’s is that? Between the lift and the heat things are very good.
Back to the 6. I’ve put off doing the seats about as long as possible. The second seat was finished on tax day, April 15th. The leather seat covers from Prestige are very nice but I should have had them installed by a pro. The seats look great in leather biscuit but there are a couple small wrinkles that bother me. I hope they will disappear once the elements get to the seat. The foam kit from Moss was very nicely cut and shaped. The headrests are not yet done.
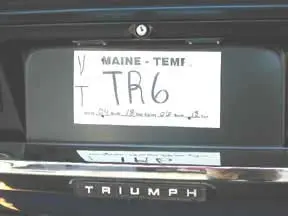
The car spent the winter in a nearby chicken barn err I should say former chicken barn. It was in good company with Corvettes, classic American cars of every kind, and gorgeous Westfield project with a Miata engine. The TR6 came out of hibernation with a bit of cranking from a fresh battery and jumper cables. Just as before it went to storage, it takes a lot of choke to keep it running until warm. Last Fall the push was just getting it together enough for storage, this Spring the emphasis is on getting it sorted out. I took the driver’s seat and the new temporary Maine veteran’s license plate that says “TR6” for the very short drive home. The regular plates will take six to eight weeks to arrive so I hope to have many miles on the paper plate before then.
Electric cooling fan
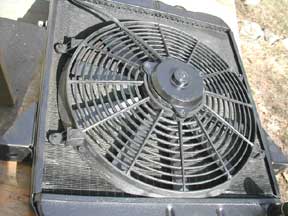
Until now the electric cooling fan has been held in place with bailing wire and electrically connected with an alligator clip -after all it was only used to get the car back and forth to storage. My plan was to fabricate some bracketry that would affix to the sides of the radiator to hold the fan. The plastic ties that were supplied with the fan looked awfully large to push through the fins of that old radiator. There has been discussion on the 6-Pack list about radiator styles used in TR6’s, so if anyone is interested, this is an original Standard Part four core radiator without a drain cock. With the radiator laying on the bench I decided to take a chance on the plastic ties. The fan should be positioned as far down on the radiator as possible in order for the fan motor to clear the cross member. The really scary part was making a path through the core for the coarse ribbed ties. An ice pick that’s definitely older than the TR6 did the job. The ties make a nice clean installation and so far haven’t created any leaks.
Reinstalling the radiator I noticed that some idiot (that would be me) put the cross brace tube that runs across the front of the engine in upside down. Grrrrrr. It really only makes a difference when putting the radiator bracing back on. It took me a while to figure out why those braces that once fit, were an inch and a half too long! It’s not really such a bad thing as it gives me the impetus to pull the harmonic balancer and mount a 60 tooth timing sprocket wheel behind it. The wheel is used to provide the timing pulses for the computerized ignition and fuel injection system. If I don’t do it now, it will have to be done in the near future anyway. At the same time I can fabricate an adjustable mount for the magnetic pick up. I’d really like to be on the road now but this is best if done now. I can always hook up the other fuel injection parts once its on the road. While the hood is off I will probably make the input duct for the radiator.
Speaking of the idiot, (you know who), well he struck again. With the car down on its wheels, it was quite evident that there was a ton of negative caster in the front wheels. Bad news is that there were no alignment shims in place at all and that adding shims would only make the camber worse. Somehow I had installed both upper “A’ arm fulcrums backwards. Needless to say, replacing the fulcrums is a piece of cake without the body installed. Not so now, but it is corrected. The hood and front fenders definetly need adjustment.
Adding fuel injection or just adding an electric fan requires the addition of a coolant temp sensor or fan switch. The TR6 coolant temp sender is British straight thread pipe rather than the more common US tapered pipe threads used in today’s cars. Fortunately British pipe is nearly the same thread pitch as US 3/8″ pipe thread, making the conversion pretty easy. Just below the thermostat, the hose nipple on the passenger side was removed. The socket was retapped to US 3/8″ NPT pipe. A pipe tap is tapered and will draw itself in by turning clockwise. Go in a little a bit then back off and turn in some more. Work it in about half way to 3/4 of the way down the threads of the tap. Blow the chips out of the new threads using compressed air. Carefully thread 3/8″ NPT brass street tee (NAPA WH 3750×6) in with Teflon tape on the threads. DO NOT OVERTIGHTEN as the fitting will act as a wedge, and if overtightened, can split the casting! The tee will go in a few threads and start to tighten with about half the threads still showing- remember they are tapered threads so it is OK. If the fitting doesn’t thread in far enough, remove the tee and run the tap in a bit further.
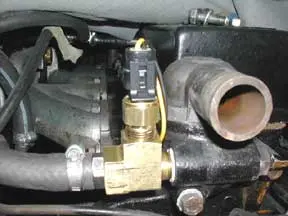
A ½” hose barb with 3/8″ threads (NAPA BK 660-1503) was screwed into one end and the sensor screwed into the center of the tee. Substituting for the sensor temporarily will be a fan switch (NAPA ECH FS118) that closes at 211 degrees ascending. There are probably better choices of switch that close at lower temps although most late model fans don’t turn on to temps as high as 230 degrees. As the fuel injection project progresses it will be replaced with a GM style coolant temp sensor (NAPA ECH TS4015). Pictured is the coolant temp sensor.
Update June 2006,
painlesswiring.com has a nice kit with fan switch (that will fit the above fittings), relay, circuit breaker, and wire. There is a choice of two thermo switches, one on at 185 and the other on at 200.
May 14th, 2003. The timing sprocket and magnetic pick up installation is done. The steering rack is tightened down, the frame cross brace reinstalled- right side up this time, and the radiator installed. Glad I took the time to do the timing sprocket now as it is a time consuming project. Starting work on the fuel injection conversion soon. There will be a section devoted to the conversion.
May 15th, 2003. Started checking the wheel alignment. At this time all I want to do is get the alignment close enough so my alignment shop can finish it. The front toe is at 1/8″ so it will be fine. Left front camber adjusted by adding three shims behind the lower control arm mounts. Right toe off on both sides. One shim to the outer mount on the left and two shims to the outer mount on the right. Rear wheel camber looks pretty close however the right rear body height is high and the left front low. It is possible that there is an extra spring spacer in the right rear causing the problem. Also possible that the left front spring is weak.